C3 OpenGL
Initializing the project
c3c init c3_opengl
cd c3_opengl
Fetching GLFW and OpenGL
c3c vendor-fetch glfw
c3c vendor-fetch opengl
NOTE: Unlike in the raylib example, the GLFW package currently do not include a pre-built static library so you need to ensure that you have GLFW installed on your system.
Setting up GLFW
Let's edit main.c3 to get a window and basic input handling.
module c3_opengl;

import std::io;
import std::math;
import glfw;

fn int main()
{
    glfw::init();
    defer glfw::terminate();

    GlfwWindow* window;
    window = glfw::createWindow(800, 600, "C3 OpenGL", null, null);

    glfw::makeContextCurrent(window);
    glfw::swapInterval(1);
    glfw::setKeyCallback(window, &key_callback);

    while (!glfw::windowShouldClose(window))
    {
        gl::clear(gl::GL_COLOR_BUFFER_BIT);
        glfw::swapBuffers(window);
    }

    return 0;
}

fn void key_callback(GlfwWindow* window,
                     int key, int scancode,
                     int action, int mods)
{
    if (key == glfw::KEY_ESCAPE && action == glfw::PRESS)
    {
        glfw::setWindowShouldClose(window, 1);
    }
}
Run the project using c3c run, you should get an empty window and
pressing Escape should cause it to close.
Initializing OpenGL
Import opengl
import opengl::gl;
Write a function for initializing OpenGL
fn void init_gl()
{
    opengl::loadGL((GLLoadFn)&glfw::getProcAddress);
    char* renderer = gl::getString(gl::GL_RENDERER);
    char* version = gl::getString(gl::GL_VERSION);
    io::printfn("Renderer: %s", (ZString)renderer);
    io::printfn("Version: %s", (ZString)version);
}
Call this function from main and run the project again, if all goes well you should see rendering information as well as your OpenGL version being printed.
Drawing our first quad
In this article we will work our way towards drawing a cube but let's start out with a single quad meaning we will have to draw two triangles.
First we define an array of floats where each triplet corresponds to a single vertex. Add the following, either globally or in main.
const float[*] VERTICES = {
    -0.5f, -0.5f, 0.5f,
     0.5f, -0.5f, 0.5f,
     0.5f,  0.5f, 0.5f,
     0.5f,  0.5f, 0.5f,
    -0.5f,  0.5f, 0.5f,
    -0.5f, -0.5f, 0.5f,
};
notice that there are some duplicates, this can be avoided by using an index buffer together with an indexed draw-call but we will skip this for the sake simplicity.
Now we need to upload this vertex data to the GPU. We'll create a vertex buffer (vbo) and a vertex array (vao) in the main function.
uint vbo, vao;
gl::genVertexArrays(1, &vao);
gl::genBuffers(1, &vbo);

defer {
    gl::deleteBuffers(1, &vbo);
    gl::deleteBuffers(1, &vao);
}
Then we bind the buffer and upload the vertex data.
gl::bindVertexArray(vao);
gl::bindBuffer(gl::GL_ARRAY_BUFFER, vbo);
gl::bufferData(
    target: gl::GL_ARRAY_BUFFER,
    size: $sizeof(VERTICES),
    data: &VERTICES,
    usage: gl::GL_STATIC_DRAW
);
notice in the call to bufferData we used the keyword-argument feature
of C3.
Now we need to tell OpenGL how to interpret this data, this is done
using vertex attributes, i.e. its layout.
gl::enableVertexAttribArray(0);
gl::vertexAttribPointer(
    index: 0,
    size: 3,
    type: gl::GL_FLOAT,
    normalized: gl::GL_FALSE,
    stride: 3 * float.sizeof,
    pointer: (void*)0
);
The vertex positions is the first and currently only attribute,
it has index 0. Each vertex position has a size of 3, i.e.
number of elements. Each element has type float and between each
vertex position there is a stride of 3 * float.sizeof bytes to the next
one. We also specify an offset pointer of zero to the first vertex position.
Finally, we need to add a call to gl::drawArrays in our main loop.
while (!glfw::windowShouldClose(window))
{
    gl::clear(gl::GL_COLOR_BUFFER_BIT);
    gl::drawArrays(gl::GL_TRIANGLES, 0, 6);
    glfw::swapBuffers(window);
}
We should now be able to run our program and see our first quad.
Shaders
Before adding more quads we should add shaders. Define the following pair of shader sources.
const char* VERTEX_SHADER = `
    #version 410 core
    layout(location = 0) in vec3 apos;

    void main()
    {
        gl_Position = vec4(apos, 1.0);
    }
`;

const char* FRAGMENT_SHADER = `
    #version 410 core
    out vec4 FragColor;

    void main()
    {
        FragColor = vec4(1.0, 0.0, 0.0, 1.0);
    }
`;
For the sake of convenience, let's make a function that will load and compile our shaders. Let's also create a new module for this, either in the same file or a separate one.
module shader;
import std::io;
import std::math::matrix;
import opengl::gl;

faultdef SHADER_COMPILATION_FAILED;

fn uint? compile(GLenum shadertype, char** src)
{
    int id = gl::createShader(shadertype);
    gl::shaderSource(id, 1, src, null);
    gl::compileShader(id);

    int success;
    gl::getShaderiv(shader, gl::GL_COMPILE_STATUS, &success);

    if (!success)
    {
        GLsizei len;
        char[512] infoLog;
        gl::getShaderInfoLog(id, 512, &len, &infoLog);
        io::eprintfn("SHADER ERROR: %s", (String)infoLog[:len]);
        return SHADER_COMPILATION_FAILED?;
    }

    return id;
}
Our vertex and fragment shader will need to be combined into a single shader program. Let's add a struct that will hold the ids of both shaders and the shader program itself.
struct Shader
{
    uint id;
    uint vertex_id;
    uint fragment_id;
}
and a function for creating the shader.
fn Shader? create(char** vert_src, char** frag_src)
{
    uint vertex_id = compile(gl::GL_VERTEX_SHADER, vert_src)!;
    uint fragment_id = compile(gl::GL_FRAGMENT_SHADER, frag_src)!;
    uint id = gl::createProgram();

    gl::attachShader(id, vertex_id);
    gl::attachShader(id, fragment_id);
    gl::linkProgram(id);

    return {
        .vertex_id = vertex_id,
        .fragment_id = fragment_id,
        .id = id
    };
}
Let's also create the following methods. We could have used regular functions but I will use this as an opportunity to introduce methods.
fn void Shader.delete(&self)
{
    gl::detachShader(self.id, self.vertex_id);
    gl::detachShader(self.id, self.fragment_id);
    gl::deleteShader(self.vertex_id);
    gl::deleteShader(self.fragment_id);
    gl::deleteProgram(self.id);
}

fn void Shader.use(&self)
{
    gl::useProgram(self.id);
}
That's it for our shader module, let's try it out. In our main function, add
Shader shader = shader::create(&VERTEX_SHADER, &FRAGMENT_SHADER)!!;
defer shader.delete();
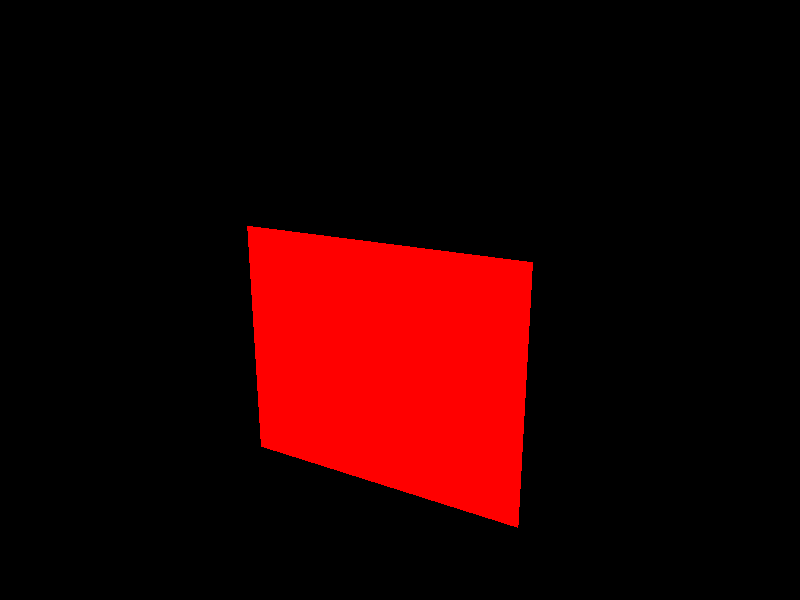
shader.use();
If we run the program we should get the same quad as before but this time it's red!
Camera
There's no point in drawing a cube if we can only see the front of it so let's implement a camera. Again, let's make a separate module for this but before doing so I'd like to introduce the notation for vectors in C3. A vector of 3 floats is denoted by
float[<3>]
we will use these a lot so I'm going to create a type alias for them at in our camera module for now.
Let's start off with the following
module camera::cam;

import std::math;
import std::math::matrix;

alias Vec3 = float[<3>];

struct Camera
{
    float fov;
    float yaw;
    float pitch;
    float speed;
    float sensitivity;
    Vec3 position;
    Vec3 front;
    Vec3 up;
    Vec3 right;
    Vec3 world_up;
}

enum Dir
{
    FORWARD, BACKWARD, LEFT, RIGHT, UP, DOWN,
}

fn void init(Camera* cam)
{
    cam.fov = (float)math::deg_to_rad(45);
    cam.yaw = -90;
    cam.pitch = 0;
    cam.speed = 0.3;
    cam.sensitivity = 0.2;
    cam.position = { 0, 0, 1 };
    cam.front = { 0, 0, -1 };
    cam.up = { 0, 1, 0 };
    cam.right = { -1, 0, 0 };
    cam.world_up = { 0, 1, 0 };
    update(cam);
}

fn void update(Camera* cam)
{
    float cam_yaw = (float)math::deg_to_rad(cam.yaw);
    float cam_pitch = (float)math::deg_to_rad(cam.pitch);

    cam.front.x = math::cos(cam_yaw) * math::cos(cam_pitch);
    cam.front.y = math::sin(cam_pitch);
    cam.front.z = math::sin(cam_yaw) * math::cos(cam_pitch);

    cam.front.normalize();

    cam.right = cam.front.cross(cam.world_up).normalize();
    cam.up = cam.right.cross(cam.front).normalize();
}

fn void Camera.move(&self, Dir dir, float dt)
{
    switch (dir)
    {
        case FORWARD: self.position += (self.front * dt);
        case BACKWARD: self.position -= (self.front * dt);
        case LEFT: self.position -= (self.right * dt);
        case RIGHT: self.position += (self.right * dt);
        case UP: self.position += (self.up * dt);
        case DOWN: self.position -= (self.up * dt);
    }
}


fn void perspective(
	float fov, float aspect, float znear, float zfar, Matrix4f* mat)
{
    float tan_half_fov = (float)math::tan(fov * 0.5);

    mat.m[0] = 1 / (aspect * tan_half_fov);
    mat.m[5] = 1 / tan_half_fov;
    mat.m[10] = - (zfar + znear) / (zfar - znear);
    mat.m[11] = -1;
    mat.m[14] = - (2 * zfar * znear) / (zfar - znear);
    mat.m[15] = 0;
}

macro look_at(Vec3 eye, Vec3 target, Vec3 up, Matrix4f* mat)
{
    Vec3 f = (eye - target).normalize(); // forward
    Vec3 r = up.cross(f).normalize();    // right
    Vec3 u = f.cross(r).normalize();     // up

    mat.m = {
    	// rotation                       // translation
    	[0] = r.x, [4] = r.y, [8]  = r.z, [12] = -r.dot(eye),
    	[1] = u.x, [5] = u.y, [9]  = u.z, [13] = -u.dot(eye),
    	[2] = f.x, [6] = f.y, [10] = f.z, [14] = -f.dot(eye),
    	[3] = 0.0, [7] = 0.0, [11] = 0.0, [15] = 1.0
    };
}

fn void view(Camera* cam, Matrix4f* dest)
{
    Vec3 center = cam.position + cam.front;
    look_at(cam.position, center, cam.up, dest);
}

fn void projection(Camera* cam, float aspect, Matrix4f* mat)
{
    return perspective(cam.fov, aspect, 0.1f, 100.1f, mat);
}
and import camera::cam in the main module.
Note that the standard library comes with a look_at and perspective
function but they currently return a matrix stored in
row-major order but this will likely change.
OpenGL assumes column-major order and we would need to tell it to transpose the matrix if we were to use the standard library implementation.
In the main module we define a global camera variable
Camera cam;
and initialize it in our main function.
cam::init(&cam);
Resources: Deriving the glm LookAt function
Shader updates
We are going to modify the vertex shader to apply a view and perspective matrix to every vertex. Our new vertex shader should look like this
const char* VERTEX_SHADER = `
    #version 410 core
    layout(location = 0) in vec3 apos;

    uniform mat4 view;
    uniform mat4 proj;

    void main()
    {
        gl_Position = proj * view * vec4(apos, 1.0);
    }
`;
In the main loop we need to set camera view matrix in our shader before the draw call. Our updated main loop will look like this
while (!glfw::windowShouldClose(window))
{
    Matrix4f view = matrix::IDENTITY4{float};
    cam::view(&cam, &view);
    shader.set_mat4("view", &view); // TODO

    gl::clear(gl::GL_COLOR_BUFFER_BIT | gl::GL_DEPTH_BUFFER_BIT);
    gl::drawArrays(gl::GL_TRIANGLES, 0, 6);
    glfw::swapBuffers(window);
    glfw::pollEvents();
}
We also need to implement set_mat4 in our shader module
fn void Shader.set_mat4(&self, String uniform, Matrix4f* mat)
{
    gl::uniformMatrix4fv(
        gl::getUniformLocation(self.id, uniform),
        1, gl::GL_FALSE, &mat.m
    );
}
Add a set_vec3 as well, we will need it later
fn void Shader.set_vec3(&self, String uniform, float[<3>] vec)
{
    gl::uniform3f(gl::getUniformLocation(self.id, uniform),
        vec.x, vec.y, vec.z);
}
Now in our main loop we need to set these matrices in our shader,
we also need to clear the color and depth buffer.
Add the following before the call to drawArrays
Matrix4f view = matrix::IDENTITY4{float};
cam::view(&cam, &view);
shader.set_mat4("view", &view);

Matrix4f proj = matrix::IDENTITY4{float};
cam::proj(&cam, 800/600, &proj);
shader.set_mat4("proj", &proj);

gl::clear(gl::GL_COLOR_BUFFER_BIT | gl::GL_DEPTH_BUFFER_BIT);
lastly, we need to enable GL_DEPTH_TEST. In the main function, after
the call to init_gl add
gl::enable(gl::GL_DEPTH_TEST);
If we run the program now, we should still be able to see our red quad.
Camera movement
Now let's hook up keyboard input to our camera movement. Add the following function in the main module.
fn void handle_input(GlfwWindow* window, Camera* cam, float dt)
{
    if (glfw::getKey(window, glfw::KEY_W)) {
    	cam.move(Dir.FORWARD, dt);
    }
    if (glfw::getKey(window, glfw::KEY_S)) {
    	cam.move(Dir.BACKWARD, dt);
    }
    if (glfw::getKey(window, glfw::KEY_A)) {
    	cam.move(Dir.LEFT, dt);
    }
    if (glfw::getKey(window, glfw::KEY_D)) {
    	cam.move(Dir.RIGHT, dt);
    }
    if (glfw::getKey(window, glfw::KEY_E)) {
    	cam.move(Dir.UP, dt);
    }
    if (glfw::getKey(window, glfw::KEY_Q)) {
    	cam.move(Dir.DOWN, dt);
    }
}
to call this function we will need to calculate the time it took for a previous frame to draw (delta_time).
Add these two variables before the main loop
float delta_time = 0.0;
float last_frame_time = 0.0;
then, at the beginning of the main loop we calculate the delta_time and
make a call to handle_input. Our main loop should now look like this
while (!glfw::windowShouldClose(window))
{
    float now = (float)glfw::getTime();
    delta_time = now - last_frame_time;
    last_frame_time = now;
    handle_input(window, &cam, delta_time);

    Matrix4f view = matrix::IDENTITY4{float};
    cam::view(&cam, &view);
    shader.set_mat4("view", &view);

    Matrix4f proj = matrix::IDENTITY4{float};
    cam::projection(&cam, 800/600, &proj);
    shader.set_mat4("proj", &proj);

    gl::clear(gl::GL_COLOR_BUFFER_BIT | gl::GL_DEPTH_BUFFER_BIT);
    gl::drawArrays(gl::GL_TRIANGLES, 0, 6);
    glfw::swapBuffers(window);

    glfw::pollEvents();
}
we should now be able to move around.
Mouse look
To get the ability to look around we need to add mouse look.
In the camera module
fn void Camera.mouse_look(&self, float xoffset, float yoffset)
{
    self.yaw += xoffset * self.sensitivity;
    self.pitch += yoffset * self.sensitivity;

    if (self.pitch > 89.0f) self.pitch = 89.0f;
    if (self.pitch < -89.0f) self.pitch = -89.0f;

    update(self);
}
In the main module we need to set a couple of glfw callbacks and some global state
float last_x = 0;
float last_y = 0;

fn void cursor_enter_callback(GlfwWindow* window, int entered)
{
    if (entered)
    {
        double x, y;
        glfw::getCursorPos(window, &x, &y);
        last_x = (float)x;
        last_y = (float)y;
    }
}

fn void mouse_callback(GlfwWindow* window, double x, double y)
{
    float xoffset = (float)x - last_x;
    float yoffset = last_y - (float)y;

    last_x = (float)x;
    last_y = (float)y;

    cam.mouse_look(xoffset, yoffset);
}
The reason for the cursor_enter_callback is that
we want to initialize the last_x and last_y variables
to something sensible when the cursor enters the window.
Now we need to hook up these callbacks in our main function,
we also set our desired inputMode.
glfw::setInputMode(window, glfw::CURSOR, glfw::CURSOR_NORMAL);
glfw::setCursorEnterCallback(window, &cursor_enter_callback);
glfw::setCursorPosCallback(window, &mouse_callback);
If all goes well, we should now be able to look around using the mouse.
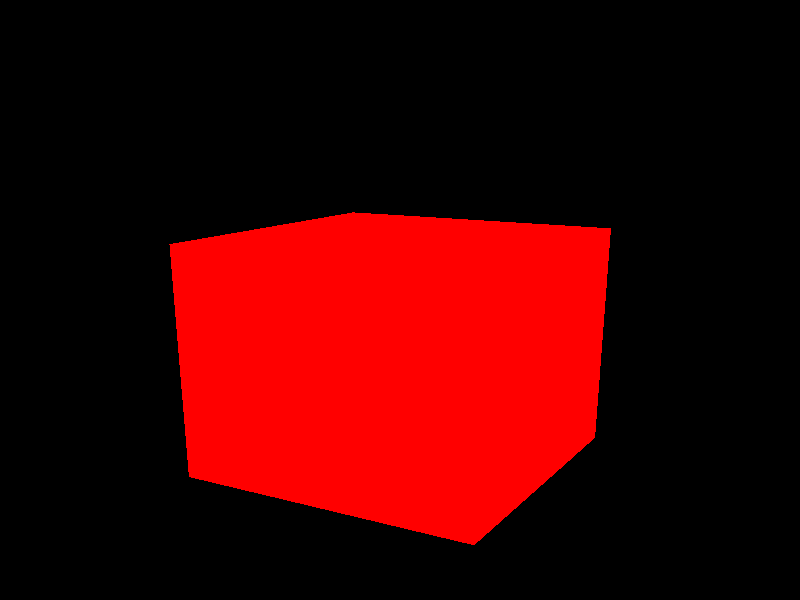
Drawing a cube
We are going to need a few more vertices, 36 of them to be exact.
const float[*] VERTICES = {
    -0.5f, -0.5f, -0.5f,
     0.5f, -0.5f, -0.5f,
     0.5f,  0.5f, -0.5f,
     0.5f,  0.5f, -0.5f,
    -0.5f,  0.5f, -0.5f,
    -0.5f, -0.5f, -0.5f,

    -0.5f, -0.5f,  0.5f,
     0.5f, -0.5f,  0.5f,
     0.5f,  0.5f,  0.5f,
     0.5f,  0.5f,  0.5f,
    -0.5f,  0.5f,  0.5f,
    -0.5f, -0.5f,  0.5f,

    -0.5f,  0.5f,  0.5f,
    -0.5f,  0.5f, -0.5f,
    -0.5f, -0.5f, -0.5f,
    -0.5f, -0.5f, -0.5f,
    -0.5f, -0.5f,  0.5f,
    -0.5f,  0.5f,  0.5f,

     0.5f,  0.5f,  0.5f,
     0.5f,  0.5f, -0.5f,
     0.5f, -0.5f, -0.5f,
     0.5f, -0.5f, -0.5f,
     0.5f, -0.5f,  0.5f,
     0.5f,  0.5f,  0.5f,

    -0.5f, -0.5f, -0.5f,
     0.5f, -0.5f, -0.5f,
     0.5f, -0.5f,  0.5f,
     0.5f, -0.5f,  0.5f,
    -0.5f, -0.5f,  0.5f,
    -0.5f, -0.5f, -0.5f,

    -0.5f,  0.5f, -0.5f,
     0.5f,  0.5f, -0.5f,
     0.5f,  0.5f,  0.5f,
     0.5f,  0.5f,  0.5f,
    -0.5f,  0.5f,  0.5f,
    -0.5f,  0.5f, -0.5f,
};
As mentioned earlier, for the sake of simplicity we will skip indexed drawing which would allow us to reuse vertices.
Now we simply need to update our call to drawArrays like so
gl::drawArrays(gl::GL_TRIANGLES, 0, 36);
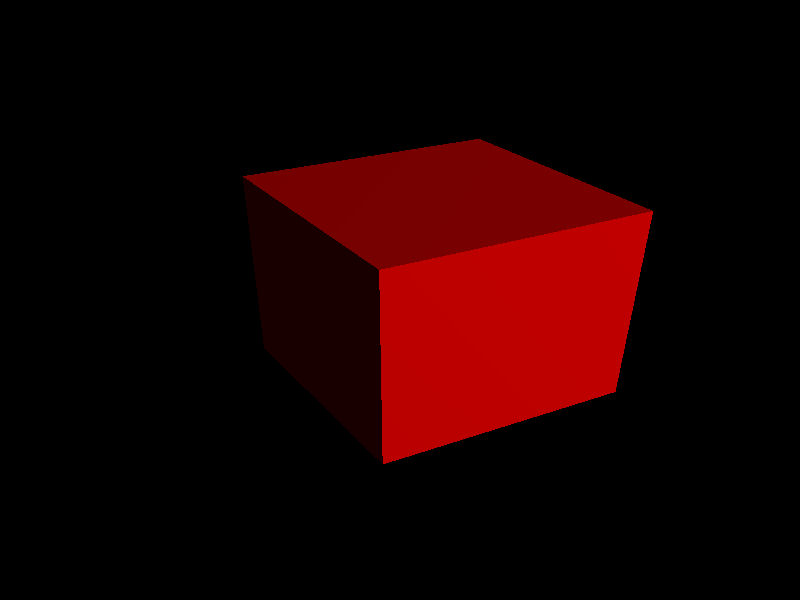
Lighting
Our cube is looking a bit flat, our final task will be to add some basic lighting.
Normal data
First we need add normal vector data to our vertices.
const float[*] VERTICES = {
	// Position           // Normal
    -0.5f, -0.5f, -0.5f,  0.0f, 0.0f, -1.0f,
     0.5f, -0.5f, -0.5f,  0.0f, 0.0f, -1.0f,
     0.5f,  0.5f, -0.5f,  0.0f, 0.0f, -1.0f,
     0.5f,  0.5f, -0.5f,  0.0f, 0.0f, -1.0f,
    -0.5f,  0.5f, -0.5f,  0.0f, 0.0f, -1.0f,
    -0.5f, -0.5f, -0.5f,  0.0f, 0.0f, -1.0f,

    -0.5f, -0.5f,  0.5f,  0.0f, 0.0f, 1.0f,
     0.5f, -0.5f,  0.5f,  0.0f, 0.0f, 1.0f,
     0.5f,  0.5f,  0.5f,  0.0f, 0.0f, 1.0f,
     0.5f,  0.5f,  0.5f,  0.0f, 0.0f, 1.0f,
    -0.5f,  0.5f,  0.5f,  0.0f, 0.0f, 1.0f,
    -0.5f, -0.5f,  0.5f,  0.0f, 0.0f, 1.0f,

    -0.5f,  0.5f,  0.5f,  -1.0f, 0.0f, 0.0f,
    -0.5f,  0.5f, -0.5f,  -1.0f, 0.0f, 0.0f,
    -0.5f, -0.5f, -0.5f,  -1.0f, 0.0f, 0.0f,
    -0.5f, -0.5f, -0.5f,  -1.0f, 0.0f, 0.0f,
    -0.5f, -0.5f,  0.5f,  -1.0f, 0.0f, 0.0f,
    -0.5f,  0.5f,  0.5f,  -1.0f, 0.0f, 0.0f,

     0.5f,  0.5f,  0.5f,  1.0f, 0.0f, 0.0f,
     0.5f,  0.5f, -0.5f,  1.0f, 0.0f, 0.0f,
     0.5f, -0.5f, -0.5f,  1.0f, 0.0f, 0.0f,
     0.5f, -0.5f, -0.5f,  1.0f, 0.0f, 0.0f,
     0.5f, -0.5f,  0.5f,  1.0f, 0.0f, 0.0f,
     0.5f,  0.5f,  0.5f,  1.0f, 0.0f, 0.0f,

    -0.5f, -0.5f, -0.5f,  0.0f, -1.0f, 0.0f,
     0.5f, -0.5f, -0.5f,  0.0f, -1.0f, 0.0f,
     0.5f, -0.5f,  0.5f,  0.0f, -1.0f, 0.0f,
     0.5f, -0.5f,  0.5f,  0.0f, -1.0f, 0.0f,
    -0.5f, -0.5f,  0.5f,  0.0f, -1.0f, 0.0f,
    -0.5f, -0.5f, -0.5f,  0.0f, -1.0f, 0.0f,

    -0.5f,  0.5f, -0.5f,  0.0f, 1.0f, 0.0f,
     0.5f,  0.5f, -0.5f,  0.0f, 1.0f, 0.0f,
     0.5f,  0.5f,  0.5f,  0.0f, 1.0f, 0.0f,
     0.5f,  0.5f,  0.5f,  0.0f, 1.0f, 0.0f,
    -0.5f,  0.5f,  0.5f,  0.0f, 1.0f, 0.0f,
    -0.5f,  0.5f, -0.5f,  0.0f, 1.0f, 0.0f,
};
Updated shaders
Next, we update the code for our vertex and fragment shader.
const char* VERTEX_SHADER = `
#version 410 core

    layout(location = 0) in vec3 apos;
    layout(location = 1) in vec3 anormal;

    out vec3 FragPos;
    out vec3 Normal;

    uniform mat4 view;
    uniform mat4 proj;
    uniform mat4 model;

    void main()
    {
        FragPos = vec3(model * vec4(apos, 1.0));
        Normal = mat3(transpose(inverse(model))) * anormal;

        gl_Position = proj * view * model * vec4(FragPos, 1.0);
    }
`;

const char* FRAGMENT_SHADER = `
    #version 410 core
    out vec4 FragColor;

    in vec3 Normal;
    in vec3 FragPos;

    uniform vec3 lightPos;
    uniform vec3 lightColor;
    uniform vec3 objectColor;

    void main()
    {
        // ambient
        float ambientStrength = 0.1;
        vec3 ambient = ambientStrength * lightColor;

        // diffuse
        vec3 norm = normalize(Normal);
        vec3 lightDir = normalize(lightPos - FragPos);
        float diff = max(+(dot(norm, lightDir)), 0.0);
        vec3 diffuse = diff * lightColor;

        vec3 result = (ambient + diffuse) * objectColor;
        FragColor = vec4(result, 1.0);
    }
`;
Notice the addition of a second layout in the vertex shader, just like before we need to tell OpenGL how to interpret this data. Our previous layout has to change as well because the stride just became larger.
We modify our previous layout
gl::enableVertexAttribArray(0);
gl::vertexAttribPointer(
    index: 0,
    size: 3,
    type: gl::GL_FLOAT,
    normalized: gl::GL_FALSE,
    stride: 6 * float.sizeof,
    pointer: (void*)0
);
and enable a second one
gl::enableVertexAttribArray(1);
gl::vertexAttribPointer(
    index: 1,
    size: 3,
    type: gl::GL_FLOAT,
    normalized: gl::GL_FALSE,
    stride: 6 * float.sizeof,
    pointer: (void*)(3*float.sizeof)
);
Updated main loop
In our main loop we now need to set our new uniform shader variables
shader.set_vec3("lightColor", {1 ,1 ,1});
shader.set_vec3("lightPos", {17, 10, 17});
shader.set_vec3("objectColor", {1, 0, 0});
In our new vertex shader we also added a uniform for a model matrix, we will set it to be the identity matrix for now.
Matrix4f model = matrix::IDENTITY4{float};
shader.set_mat4("model", &model);
Our new and final main loop should now look something like this
while (!glfw::windowShouldClose(window))
{
    float now = (float)glfw::getTime();
    delta_time = now - last_frame_time;
    last_frame_time = now;

    handle_input(window, &cam, delta_time);

    shader.set_vec3("lightColor", {1 ,1 ,1});
    shader.set_vec3("lightPos", {17, 10, 17});

    Matrix4f view = matrix::IDENTITY4{float};
    cam::view(&cam, &view);
    shader.set_mat4("view", &view);

    Matrix4f proj = matrix::IDENTITY4{float};
    cam::projection(&cam, 800/600, &proj);
    shader.set_mat4("proj", &proj);

    Matrix4f model = matrix::IDENTITY4{float};
    shader.set_vec3("objectColor", {1, 0, 0});
    shader.set_mat4("model", &model);

    gl::clear(gl::GL_COLOR_BUFFER_BIT | gl::GL_DEPTH_BUFFER_BIT);
    gl::drawArrays(gl::GL_TRIANGLES, 0, 36);
    glfw::swapBuffers(window);

    glfw::pollEvents();
}
Finally!